
I know it has been a long time since I've updated. There has been some changes in what I am doing now in church! I no longer have the responsibility of directing ward members with food storage, I now get to direct the stake!
With that said, I would still like to help anyone in need of assistance in any area of food storage you may have questions in, but I will not be holding meetings or classes within the ward as I had planned.
I am still trying to get settled in my new calling as Stake Home Storage Specialist and hopefully I will still be able to help everyone be prepared at a stake wide level.
I am still going to be working on my own food storage and learning new things, so I'm sure there will be opportunities for me to share some fun food supply things with you, that will help in reaching your food supply goals!
I am so grateful for the opportunity I had to serve you! I loved it! Thank so much for all your support:) Hopefully I helped someone learn something!
Crystal
Thursday, January 7, 2010

Tuesday, December 8, 2009
Food Storage Activities
Hey Everyone!
Just thought I'd keep you updated on what will be happening in the next year with food storage activities.
Because of some changes made in RS, we will only be having about three days next year for food storage activities. So what I have decided to do is take advantage of those three dates available to learn something about food storage, and combine a few activities into one night, so we can learn multiple things at once.
Therefore, there will be no binder class in Dec. We will still be putting together food storage binders, but we will be doing it in the next few months, along with other activities:)
Sorry about any inconvenience. I am still really excited to give the classes! I'll keep you updated as I get dates and more information!
Thanks, Crystal
Just thought I'd keep you updated on what will be happening in the next year with food storage activities.
Because of some changes made in RS, we will only be having about three days next year for food storage activities. So what I have decided to do is take advantage of those three dates available to learn something about food storage, and combine a few activities into one night, so we can learn multiple things at once.
Therefore, there will be no binder class in Dec. We will still be putting together food storage binders, but we will be doing it in the next few months, along with other activities:)
Sorry about any inconvenience. I am still really excited to give the classes! I'll keep you updated as I get dates and more information!
Thanks, Crystal
Saturday, November 21, 2009
Cheese Waxing Instructions
Thanks to all those that were able to come to the cheese waxing class! I hope everyone that came learned something:)
I know there are a lot of you who couldn't make it that night and wanted to know how to do it. So, since it is SO easy, I thought I'd post step by step instructions with a few pictures. All the information we went over at the class is right here!

Cheese wax can be purchased at: http://www.blendedwaxes.com/ This is my 5 pound block of cheese I bought for $20.00 and $12.62 for shipping (since it's so heavy). We may have an opportunity to order wax for wholesale so we can get a better price, so I will keep you informed on that.
It is important to use cheese wax. Paraffin wax does not work adequately. Paraffin is stiff and will crack when it cools allowing for the penetration of air and mold causing bacteria. Cheese wax is made specifically to coat cheese. It is formulated to be more pliable, and does not crack as easily.
 Items needed for cheese waxing:
 *Double Broiler (specifically for cheese waxing only) *Cheese *Potato Peeler (a nice one..you'll be happy to have a nice one!) *Freezer Paper (use non wax side) *Paper towels or lint free Cloth *Labels and marker to label cheese *Optional: Boar’s Hairbrush for coating cheese
Cheese wax melts at lower temperatures and should be melted in a double boiler. It’s best to get a double broiler that is fairly deep to give you plenty of room for dipping cheese. Dedicate a pan or bowl to this because the wax will claim the container as its own. The temperature of the melted wax can be between 160 and 220 degrees. The cooler the better. The wax should be melted just until there are no lumps and then turn the heat off. If the wax becomes too hot it will bring the oils of the cheese to the surface preventing the wax from adhering. Don't let it cool too much because your wax will start to get thick and your layers will be really thick and uneven.
Do not over handle the cheese with your bare hands. The oils from your hands can compromise the seal between the cheese and the wax. You also do not want to introduce any unwanted bacteria. Purchase some food grade disposable gloves from your local grocery store if you would like.
Any cheese that is firm enough to form a block can be waxed. The cheese should be cool, clean, and dry. I dry my blocks of cheese with a high quality paper towel before I dip them to soak up any excess moisture or oil. Cut the cheese into sizes that your family will use within a few days. I cut the cheese into the portion called for in a given meal; that way I am assured freshness.
Cheese is not rigid and will therefore bend and misshapen under it's own weight. As that happens it will pull the wax away from the cheese and cause air pockets. This is another reason why it is better to wax smaller lighter weight portions of cheese at a time.
Remember to heat your wax using a double boiler. You will read on the Internet that you can melt your wax in a #10 can. That is not a good practice. Number ten cans are not manufactured for constant water applications and will rust. The only double broiler I could find that would work was at Walmart for $30.00. That was the most inexpensive one I could find that would be deep enough. It is a one time investment that will last a life time. If you have more than one color of wax, use ceramic bowls or some other rust proof container that will fit on top of your boiler and can be heated.
 1. Use a potato peeler to shave wax from the block of wax and then after you get a good amount, add it to the broiler. When the wax has melted and there are no lumps, turn off the heat and wait a few minutes to start waxing so the wax isn't too hot.
Cheese wax melts at lower temperatures and should be melted in a double boiler. It’s best to get a double broiler that is fairly deep to give you plenty of room for dipping cheese. Dedicate a pan or bowl to this because the wax will claim the container as its own. The temperature of the melted wax can be between 160 and 220 degrees. The cooler the better. The wax should be melted just until there are no lumps and then turn the heat off. If the wax becomes too hot it will bring the oils of the cheese to the surface preventing the wax from adhering. Don't let it cool too much because your wax will start to get thick and your layers will be really thick and uneven.
Do not over handle the cheese with your bare hands. The oils from your hands can compromise the seal between the cheese and the wax. You also do not want to introduce any unwanted bacteria. Purchase some food grade disposable gloves from your local grocery store if you would like.
Any cheese that is firm enough to form a block can be waxed. The cheese should be cool, clean, and dry. I dry my blocks of cheese with a high quality paper towel before I dip them to soak up any excess moisture or oil. Cut the cheese into sizes that your family will use within a few days. I cut the cheese into the portion called for in a given meal; that way I am assured freshness.
Cheese is not rigid and will therefore bend and misshapen under it's own weight. As that happens it will pull the wax away from the cheese and cause air pockets. This is another reason why it is better to wax smaller lighter weight portions of cheese at a time.
Remember to heat your wax using a double boiler. You will read on the Internet that you can melt your wax in a #10 can. That is not a good practice. Number ten cans are not manufactured for constant water applications and will rust. The only double broiler I could find that would work was at Walmart for $30.00. That was the most inexpensive one I could find that would be deep enough. It is a one time investment that will last a life time. If you have more than one color of wax, use ceramic bowls or some other rust proof container that will fit on top of your boiler and can be heated.
1. Use a potato peeler to shave wax from the block of wax and then after you get a good amount, add it to the broiler. When the wax has melted and there are no lumps, turn off the heat and wait a few minutes to start waxing so the wax isn't too hot.2. Dry the block of cheese you will be waxing well, with a paper towel or lint free cloth. Flour sack cloths work well. I found that it was easier to handle the cheese if it was cold, and not setting out long.

3. Quickly dip the block of cheese half way into the wax. Allow the wax to dry slightly and dip the other half of the block, overlapping your 'dips'.

4. Allow the wax to cool before you set it on any surface otherwise it will stick. When you try to move the cheese it will pull away from the block just waxed. Set your finished blocks on the paper side of freezer paper, which has a paper side and a waxed side. (It will stick to the waxed side)
You may also use a natural bristle brush to coat the cheese. If you decide to use the brush method, a boar’s hairbrush is recommended for the smoothest application, and can be purchased at the same website as the cheese wax.
The wax should form an intimate bond with the cheese, hermetically sealing the cheese including any holes or crevices. This process protects the cheese from mold spores and unwanted fungal invasions. It also locks the natural moisture of the cheese in, preventing it from drying out and hardening.
Repeat the waxing process so that there is a minimum of three layers of wax. It is best to apply the second and third layers of wax while the previous layer is still slightly warm. You may choose to apply a fourth layer of wax for added strength.
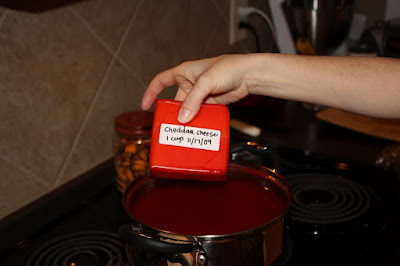 Label the cheese, type and date, before the last dipping so that the label is embedded within the wax and will not fall off. I use a self-adhesive sticker and a permanent marker.

The cheese should be stored in your coolest room (or even a mini fridge set around 60 degrees) stacked with like cheeses. Do not seal the cheese in additional containers, as the cheese requires air circulation.
 I bought my mild cheddar cheese at Sams. So I waxed 5 pounds of cheddar cheese, but split it up into 10 different serving sizes. I also bought Parmesan cheese at Sam's, but waxed even smaller portions because we don't typically use a lot of Parmesan cheese for meals.
 The cheese will continue to age over time, especially cheddar, so start with more mild cheeses. Parmesan, Swiss, Colby Jack cheese are also good. The harder and typically the more expensive the cheese, the better. Don’t try Mozzarella cheese because it spoils easily.
Although you will find that cheese wax is expensive, about 5.50/lb, it can be reused. Simply peel the wax off the cheese being used and wash it in warm soapy water. Allow the wax to dry and store it to be used in your next cheese waxing session.
You will need approximately three pounds of wax to cover ten pounds of cheese. I bought a 5 pound block of wax and I waxed about 8 pounds of cheese and I still have a ton of wax left over! I really didn't use much of it. I simply let it dry and kept it in my broiler and put the lid on to keep it dust free. All I have to do the next time I want to wax cheese, is slowly melt it again and repeat the waxing cheese process!
The experts say that cheese can be stored this way for twenty-five years. Of course if you are rotating your cheese, it will always be fresh!
If you have any questions, feel free to give me a call or email me: Crystal
Friday, October 16, 2009
Cheese Waxing Class!!
 On Tuesday, November 17th we are having a Cheese Waxing Class!! It will be held at my home. Class will begin at 7:00pm.
Come learn how to wax your own cheese! Great for your long term food supply!
(After the cheese waxing class, we will be having an order for cheese wax, so come to see if it is something you would like to take part in!) With this particular class, there will be no need to bring anything to taste:) Just come with paper and pen to take notes!
Hope to see you there!
Crystal
Order for Gripper Jars

Hopefully this will be the FINAL order for gripper jars!
1-gallon (jar and lid) gripper jars give you a whole new handle on wide mouth jars. Spin off the large cap and fill these up with anything! I use mine for my food opened from pouches, such as rice, wheat, sugar, etc.
They are coming from Salt Lake City from the same company that supplied the jars 2 years ago, as these bottles are thicker and more resistant to breakage.
Each jar is $3.25
All orders and checks (made out to Crystal Petersen) must be in my hands by October 27th. I will then send one check off to confirm our orders. I will not be accepting late checks.
Questions: Contact Crystal Petersen, 435-764-8694 or crystalcangel@yahoo.com
Questions: Contact Crystal Petersen, 435-764-8694 or crystalcangel@yahoo.com
Tuesday, October 6, 2009
Wheat Taste Test Night Canceled!
For multiple reasons, the Thursday night activity is canceled.
If you are interested in having a wheat taste test night, please let me know. If there is enough people interested, then I will try to reschedule.
Thanks, Crystal
Monday, October 5, 2009
October Emergency Essentials Order

Check out October's specials and let Carrie Wells know what you would like to order. Have order and check to her by October 27th!
They have wheat, sour cream, 100 hour candles, egg noodle pasta, hand grain mill, cheese blend, bacon, and lots more, on sale this month!
Click on http://beprepared.com/ to see sale items, and then click here: http://beprepared.com/category.asp_Q_c_E_900_A_c2c_E_tn_A_name_E_GroupSpecials
to see group specials.
Remember, in order to get the group rate, we have to meet the minimum requirement of orders, so let Carrie know asap if you are interested in an item(s) and she will let you know if we meet the group rate requirement. And also remember if we meet that requirement, then everything, even non-sale items are free shipping!
Crystal
Sunday, October 4, 2009
Farmers Market!
Humble is getting a FARMERS MARKET! Thanks to the Humble Area Chamber of Commerce, a Farmers Market is coming to Humble - every Wednesday, beginning Oct. 7, from 4-8 PM, in the parking lot of the First United Methodist Church at 800 Main St. For more information, call the Humble Area Chamber.
Monday, September 14, 2009
September Emergency Essential Order

Group specials for September are:
#10 can Egg Bowtie Noodles - 12 + $5.00 each
#10 can Freeze Dried Strawberries - 12 + $16.00
#10 can Taco Mix TVP - 6 + $10.00
Hand Grain Mill - 4+ $50.00 regularly $69.95
Clear Mist 100 Hour Emergency Candle - 24+ $3.00 regulary $4.95
Leather Gloves - 20 + $2.50 regularly $3.95
Burn Free Gel - 24 + $3.00 regularly $4.95
If you'd like any of these items or anything else from Emergency Essentials, please let Carrie know via e-mail as soon as possible. She will be collecting checks by the 27th of September.
#10 can Egg Bowtie Noodles - 12 + $5.00 each
#10 can Freeze Dried Strawberries - 12 + $16.00
#10 can Taco Mix TVP - 6 + $10.00
Hand Grain Mill - 4+ $50.00 regularly $69.95
Clear Mist 100 Hour Emergency Candle - 24+ $3.00 regulary $4.95
Leather Gloves - 20 + $2.50 regularly $3.95
Burn Free Gel - 24 + $3.00 regularly $4.95
If you'd like any of these items or anything else from Emergency Essentials, please let Carrie know via e-mail as soon as possible. She will be collecting checks by the 27th of September.
To check other September sale items, go to http://www.beprepared.com/.
Also, please note that if we do not achieve the minimum number of items to get the group discount on at least one item, we will have to pay shipping. Therefore, please wait to write your checks until we have all orders in and have met at least one minimum. If we do not have the minimum then we will play it by ear.
If you have any questions, feel free to e-mail Carrie! Thanks Carrie for coordinating these monthly orders.
Also, please note that if we do not achieve the minimum number of items to get the group discount on at least one item, we will have to pay shipping. Therefore, please wait to write your checks until we have all orders in and have met at least one minimum. If we do not have the minimum then we will play it by ear.
If you have any questions, feel free to e-mail Carrie! Thanks Carrie for coordinating these monthly orders.
Friday, September 4, 2009
Yummy!

Thanks to Karen again for coming and sharing her knowledge and skills with us! Thank you to all that were able to attend! There were over 25 people that came to the bread party and food seminar!! It was a great turn out and we had a lot of FUN!! Here's a quick picture I took of my bread! It was SO moist and fluffy:)
**If you are wanting to know what recipe she used for the bread, click HERE
**If you want to know step by step the process of making the biga and soaker, and final bread dough, click HERE
**AND if you want to get step by step instructions on how to shape, proof and bake your bread, please talk to me and I will give you a handout with all that info. Some of you left early and missed it.
Tuesday, September 1, 2009
BREAD PARTY #2
It's almost that time again!
*
The bread party is this Thursday night on the 3rd! We have moved the activity to the Atascosita Building. Because of the high number of people able to attend, we are going to try and make it work in one of the rooms at the church building, so DON'T go to Carrie's home!
*
It will start at 6:30PM.. again, at the atastocita building. Plan on staying for at least three hours.
Remember, don't forget to bring a pad and paper for notes. Also, please bring a bread pan and rolling pin, and YOUR MONEY ($2)!! Most of you have not paid, so if you don't bring it to my house or Carrie's house before, please bring the money that night so you I don't have to try gathering money after, because I really don't like to do that.
*
***Keep in mind that this is not church sponsored. Karen is just sharing the things that works for her and her family.
*
***Keep in mind that this is not church sponsored. Karen is just sharing the things that works for her and her family.
Friday, August 21, 2009
How To Video On Canning #10 Cans

Hey everyone! I found this video that shows you the whole canning process (in a #10 can).
So all those that would like to learn, here is the video.
http://everydayfoodstorage.net/2009/08/20/how-to-use-a-dry-pack-canner/food-storage-recipes
If you have any questions on how our cannery works or what canner we have available, let me know and I'll fill you in:)
Crystal
So all those that would like to learn, here is the video.
http://everydayfoodstorage.net/2009/08/20/how-to-use-a-dry-pack-canner/food-storage-recipes
If you have any questions on how our cannery works or what canner we have available, let me know and I'll fill you in:)
Crystal
Tuesday, August 18, 2009
Coupon Code For Shelf Reliance
Sara Hanks, from Shelf Reliance, has offered us some coupon codes and resources that might be able to help with food storage! If you use the code "SRTHRIVE" at the Shelf Reliance website,(link is on side of blog), you'll get 15% off retail for all of their food storage. Just letting you know! They also have other deals on their cases of food for example so check out the website if you haven't already:)
http://www.shelfreliance.com/
Thanks Sara, and happy shopping!
Crystal
http://www.shelfreliance.com/
Thanks Sara, and happy shopping!
Crystal
August Emergency Essential Orders

Just a reminder that if you would like to order something from Emergency Essentials this month, Carrie needs your orders by the 25th of August.
Freeze Dried Strawberries are again on group sale this month. We need 12 minimum to get the discount. Also, Taco flavored TVP is on special as well. There is also several other items on sale this month like Scrambled Egg Mix, Dried Peach Slices, Egg Whites, and other emergency preparedness items. Go to http://www.beprepared.com/ to check it out.
Also, if you haven't already picked up your items from last month's order from Carrie's house, please remember to go in the evening because of her new work schedule.
Thanks!
Freeze Dried Strawberries are again on group sale this month. We need 12 minimum to get the discount. Also, Taco flavored TVP is on special as well. There is also several other items on sale this month like Scrambled Egg Mix, Dried Peach Slices, Egg Whites, and other emergency preparedness items. Go to http://www.beprepared.com/ to check it out.
Also, if you haven't already picked up your items from last month's order from Carrie's house, please remember to go in the evening because of her new work schedule.
Thanks!
Monday, August 17, 2009
Dehydrating Food With The Excalibur!
Hey Everyone,
Just thought I'd pass on this great info!
If you are interested in dehydrating your own food, or if you have food from your garden that you would like to preserve, check out this site http://www.excaliburdehydrator.com/

It is a really nice dehydrator that works really well. Watch the video and see what makes it better than others. If you are anything like me, you'll add it on to your Christmas list this year...lol, I'm a geek, I know.
Also check out this website: http://www.dehydrate2store.com/
It has loads of info on dehydrating your food, such as tips, recipes, etc. So take a look!!
Thanks!! Crystal
Wednesday, August 5, 2009
Bean Recipes and Pictures!!

Here are a couple of pictures I took of the taste test night! We even had strawberry lemonade with dehydrated strawberries, ordered from the last emergency essentials order! You couldn't even tell the difference! They were yummy! There are so many things you can make with beans, but here are the things we had made for the taste test night!!
 (The first bowl is the white bean flour and the other bowl is just mashed potatoes from potato flakes to put the gravy on, which is in the middle.)
WHITE BEAN GRAVY
Made by Crystal Petersen
2 cups hot water
2 teaspoons chicken bouillon or 2 bouillon cubes
4 Tablespoons White Bean Flour*
Salt and Pepper
I made bean flour by pouring my white beans into my wondermill grinder on a fine/flour setting, just like I would do for wheat to make flour.
Boil water, whisk bean flour into water. Stir until it thickens and then reduce the heat and cook an additional 2 minutes.
**************************************
WHITE CHILI
Recipe from Rachel Turner
1 med. onion, finely chopped
2 teaspoons ground cumin
1/2 tsp. cilantro
1/2 tsp. oregano
1 (4oz.)can chopped green chilies, drained (beware that some canned chilies are spicy)
3 tablespoon olive oil
2 (15.8oz)cans of Great Northern white beans
1 (14 1/2 oz.) can chicken broth
1 1/2 cups cubed or chopped cooked chicken breast
In large skillet, cook onion in oil for 4 minutes or until transparent. Saute chicken until cooked. Add chilies, and cumin; cook and stir for 2 minutes. Add beans and chicken broth bring to a boil. cook until hot.
2 teaspoons ground cumin
1/2 tsp. cilantro
1/2 tsp. oregano
1 (4oz.)can chopped green chilies, drained (beware that some canned chilies are spicy)
3 tablespoon olive oil
2 (15.8oz)cans of Great Northern white beans
1 (14 1/2 oz.) can chicken broth
1 1/2 cups cubed or chopped cooked chicken breast
In large skillet, cook onion in oil for 4 minutes or until transparent. Saute chicken until cooked. Add chilies, and cumin; cook and stir for 2 minutes. Add beans and chicken broth bring to a boil. cook until hot.
**************************************

LENTIL COOKIES
Made by Rebecca Moser
1c Whole wheat flour
1c White flour
1tsp Baking powder
1/2tsp Cinnamon
1/2tsp Allspice
1c Sugar
3/4c Butter
1 Egg
2tsp Vanilla
1c Lentil Puree*
1c Oats
1/2c Craisins
1/2c Coconut
1/2c White chocolate chips
*Prepare dry lentils as directed on bag. Puree prepared lentils in a blender. (1/2c dry lentils=1c pureed lentils.)
Directions: Preheat oven to 375F. Cream sugar & Butter. Add egg, vanilla an lentil puree. Combine flour, baking powder and spices in separate bowl. Then add to creamed mixture. Stir in remaining ingredients. Scoop cookies onto baking sheet. Bake about 15 minutes.
***********************************
 LENTIL SOUP
 Made by Rachel Turner
1 med. onion, diced
3 carrots, diced
1 stock celery, sliced
6 cups water
2 cups (16oz) dried lentils
1/2 cup diced ham
1/2 teaspoon garlic powder
1 chicken bouillon cube
1/4 teaspoon dried thyme
1 bay leaf
1 can (14.5oz) diced tomatoes
Directions: Combine ingredients. Heat to boiling and cover and simmer for about 1 hour.
(This recipe can be made with all items from food storage if you have dehydrated carrots, celery, and onion...which carrots and onions are available at the cannery)
************************************

BEAN PIE
Made by Carrie Wells
1 heaping cup of pureed Pinto Beans*
½ C. sugar
1 C. brown sugar
½ cup butter
2 eggs, beaten
Unbaked pie shell
*1 ½ cup cooked beans equals about 1 cup mashed.
Blend sugars, eggs and butter until creamy. Add pinto beans and blend well.
Pour into 9” unbaked pie shell.
Bake at 375 F for 20 minutes, then at 350 for an additional 25 minutes or until inserted knife comes out clean. Note: This pie tastes like Pecan Pie and can be served with whipped cream, non-dairy whipped topping or a scoop of ice cream. Nutritional analysis per serving: 427 Cal.; 5.74 g protein; 20.5 g fat (42% cal. from fat); 57.25 g carb.; 83 mg cholesterol; 4.1 g fiber; 264 mg sodium
It was the same recipe as the one Tara Hart made for the emergency fair, except she omitted the pecans and the beans were almost pureed...but they were both fantastic!!
***********************************
 BEAN DIP
BEAN DIPMade by Carrie Wells
Recipe coming Soon
Thursday, July 30, 2009
Bean Taste Test Email
I encourage all those who didn't come this month to the taste test night, to come to the next taste test night! It was really fun to go and taste food made from beans, and we talked not only about beans but all aspects of food storage in a very casual setting.
There are many who ask to know how to do things with their food storage and we are trying hard to make it possible to learn new things and get you prepared, but it's up to you to sacrifice your time to come to food storage events we have put together. We'd love to see more people participate!!
It's great to see the ward progress in their food storage efforts. Keep up the good work!!
We have some great classes coming up in the next 6 months, so I'll keep you updated:)
I am sending out an email with an attachment on the packet of information on beans I have put together and gave out during the taste test night, so if you do not receive that email within a few days, please let me know if you would like me to send the information to you! It has everything you need to know about beans! Recipes to come!!
Crystal
Tuesday, July 28, 2009
Taste Test Night!!
Just a reminder for the Taste Test night this Thursday at Carrie Wells home at 6:30pm.
Please keep in mind that you DO NOT have to make something to come. If you would like to come but you would rather not make something, then just come! We would rather have you come than not:)
There will be loads of info on everything there is to know about beans/legumes...and of course stuff to eat!!
Hope to see you there! If you are planning on coming contact Carrie at cbear1230@gmail.com
Thanks!!
Crystal
Please keep in mind that you DO NOT have to make something to come. If you would like to come but you would rather not make something, then just come! We would rather have you come than not:)
There will be loads of info on everything there is to know about beans/legumes...and of course stuff to eat!!
Hope to see you there! If you are planning on coming contact Carrie at cbear1230@gmail.com
Thanks!!
Crystal
Monday, July 13, 2009
Food Storage Group for Taste Test Nights
Food Storage Group
This group will explore food storage items. Once a month we will meet and have a “Taste Test” night. We will focus on one product each month, learning how to store it, what to store, how to prepare using various recipes, and any other information relevant to that product.
You can sign up each month to bring a tasting dish using that product we are discussing.
Taste test nights will be at Carrie Wells home at 12511 Brazos Bend Trail, Humble, TX 77346, at 6:30 p.m.
July 30th, We will be focusing on beans and legumes.
September 3rd, Bread Party & Food Seminar! Karen has been so nice and willing to come back and share her talent of making great bread with us. She also has some great helpful tips on getting, keeping and using your food supply! If you didn't make the first one, this is a must!! Very informative! You do not have to make bread if you don't want to. Just come with a notepad and pen and takes notes. If you would like to make a loaf of bread to take home and bake then you will need to bring a bread pan and rolling pin!
If you are planning on making bread, you must pay Carrie Wells, or Crystal Petersen BEFORE September 1st. As before, she makes perishable bread kits the day before so we need to know on the night of the 1st (which is a Tuesday) who exactly is coming. Please ladies, if you sign up and pay, please come. AND please bring your husbands if they are available to come!!
The cost is $2.00 per loaf of bread.
This group will explore food storage items. Once a month we will meet and have a “Taste Test” night. We will focus on one product each month, learning how to store it, what to store, how to prepare using various recipes, and any other information relevant to that product.
You can sign up each month to bring a tasting dish using that product we are discussing.
Taste test nights will be at Carrie Wells home at 12511 Brazos Bend Trail, Humble, TX 77346, at 6:30 p.m.
July 30th, We will be focusing on beans and legumes.
September 3rd, Bread Party & Food Seminar! Karen has been so nice and willing to come back and share her talent of making great bread with us. She also has some great helpful tips on getting, keeping and using your food supply! If you didn't make the first one, this is a must!! Very informative! You do not have to make bread if you don't want to. Just come with a notepad and pen and takes notes. If you would like to make a loaf of bread to take home and bake then you will need to bring a bread pan and rolling pin!
If you are planning on making bread, you must pay Carrie Wells, or Crystal Petersen BEFORE September 1st. As before, she makes perishable bread kits the day before so we need to know on the night of the 1st (which is a Tuesday) who exactly is coming. Please ladies, if you sign up and pay, please come. AND please bring your husbands if they are available to come!!
The cost is $2.00 per loaf of bread.
If you have any questions, please contact Carrie Wells at 281-608-9641, cbear1230@gmail.com or Crystal Petersen at crystalcangel@yahoo.com
Wednesday, July 8, 2009
Just a reminder about Karen's food ordering opportunity
UPDATE****THIS ORDER IS STILL OPEN, SO IF YOU HAVE NOT YET ORDERED YOU STILL HAVE A CHANCE!****(Updated on Aug. 6th, 2009)
Once again, Karen Wilkinson, the same gal that came to give up a bread party, is taking orders for a bunch of things for your food supply! She will take orders until she fills up the truck!
Check out her website here http://kneadfulthingsnow.com/currentpreorder.aspx
and here http://kneadfulthingsnow.com/wheatorder.aspx
and here http://kneadfulthingsnow.com/glutenfreeorder.aspx (gluten free order)
to find out what she is going to have available to order.
I have compared and ordered quite a few things myself from each truck she has coming in. If you are interested in getting anything, all the order info and contact info is stated in the above links!
Also, she sends some great information in her newsletters/emails she sends out occasionally. She has some great input on different things and also she has great news info on what is going on with crops, wheat, etc. so if you haven't already signed up, do:) The option to be added to the newsletter is on her home page. You'll see it if you scroll down to the bottom of the page! She has sent me info that I would like to share, but I would rather you choose to recieve the info and not get bombarded with emails from me:)
Let me know if you have any questions:)
Thanks, Crystal
Once again, Karen Wilkinson, the same gal that came to give up a bread party, is taking orders for a bunch of things for your food supply! She will take orders until she fills up the truck!
Check out her website here http://kneadfulthingsnow.com/currentpreorder.aspx
and here http://kneadfulthingsnow.com/wheatorder.aspx
and here http://kneadfulthingsnow.com/glutenfreeorder.aspx (gluten free order)
to find out what she is going to have available to order.
I have compared and ordered quite a few things myself from each truck she has coming in. If you are interested in getting anything, all the order info and contact info is stated in the above links!
Also, she sends some great information in her newsletters/emails she sends out occasionally. She has some great input on different things and also she has great news info on what is going on with crops, wheat, etc. so if you haven't already signed up, do:) The option to be added to the newsletter is on her home page. You'll see it if you scroll down to the bottom of the page! She has sent me info that I would like to share, but I would rather you choose to recieve the info and not get bombarded with emails from me:)
Let me know if you have any questions:)
Thanks, Crystal
July Emergency Essentials Order

Here are the Group Specials for Emergency Essentials for the month of July.
Deadline to get your order and check to Carrie is July 24th. Remember that you can order anything you'd like, you're not limited to the Specials.
Also, all of the specials have a minimum quantity to order to get the discount. Carrie will keep you all posted and let you know when we reach the minimums so that you will know how much your item will cost. Please make your checks out to Emergency Essentials and not Carrie.
FD Strawberries - sliced Reg. - $23.95 per can, Group Special - 12 or more $16.00 per can
FD Monterey Jack Cheese - Reg. $44.95 Special - 6 or more $25.00 per can
Whole Egg Powder - Reg. $27.95, Special - 12 or more $16.00 per can
Complete Mashed Potatoes - Reg. $12.95, Special - 12 or more $8.00 per can
Katadyn Combi Water Filter - Reg. $159.95, Special - 3 or more $120.00
Leather Gloves - Reg. $3.95, Special - 20 or more $2.50
We are still looking for people who are interested in ordering the Freeze Dried Mozzarella cheese. Around July 10th or so, Carrie will call Emergency Essentials with the number of cans we want to order for our group and see what kind of a discount they will give us. So, if you are even interested in 1 can let Carrie or I know so that we can add it to our list. So far, we have about 19 cans that people want.
Thanks Carrie for coordinating these orders!
Crystal
Deadline to get your order and check to Carrie is July 24th. Remember that you can order anything you'd like, you're not limited to the Specials.
Also, all of the specials have a minimum quantity to order to get the discount. Carrie will keep you all posted and let you know when we reach the minimums so that you will know how much your item will cost. Please make your checks out to Emergency Essentials and not Carrie.
FD Strawberries - sliced Reg. - $23.95 per can, Group Special - 12 or more $16.00 per can
FD Monterey Jack Cheese - Reg. $44.95 Special - 6 or more $25.00 per can
Whole Egg Powder - Reg. $27.95, Special - 12 or more $16.00 per can
Complete Mashed Potatoes - Reg. $12.95, Special - 12 or more $8.00 per can
Katadyn Combi Water Filter - Reg. $159.95, Special - 3 or more $120.00
Leather Gloves - Reg. $3.95, Special - 20 or more $2.50
We are still looking for people who are interested in ordering the Freeze Dried Mozzarella cheese. Around July 10th or so, Carrie will call Emergency Essentials with the number of cans we want to order for our group and see what kind of a discount they will give us. So, if you are even interested in 1 can let Carrie or I know so that we can add it to our list. So far, we have about 19 cans that people want.
Thanks Carrie for coordinating these orders!
Crystal
Wednesday, June 17, 2009
Wonder Junior Mill discounted!
Wonder Junior Hand Mills are available from June 15th-August 15th 2009 with free shipping and also a 20 dollar rebate from the Food Storage Made Easy Website. The Wonder Junior Hand Mill is said to be "the best hand mill in the world."
Click here http://foodstoragemadeeasy.net/ and here http://foodstoragemadeeasy.net/products-we-recommend/grain-mills-wheat-grinders/ for info on the grinder.
The website is also doing a summer crash course which includes challenges, helpful information and prizes, so read up on it and if you are interested join in! http://foodstoragemadeeasy.net/2009/06/14/summer-crash-course/
Click here http://foodstoragemadeeasy.net/ and here http://foodstoragemadeeasy.net/products-we-recommend/grain-mills-wheat-grinders/ for info on the grinder.
The website is also doing a summer crash course which includes challenges, helpful information and prizes, so read up on it and if you are interested join in! http://foodstoragemadeeasy.net/2009/06/14/summer-crash-course/
Thursday, June 11, 2009
Another Food Order Opportunity and Menu Plan for Your Year Food Supply
UPDATE****THIS ORDER IS STILL OPEN, SO IF YOU HAVE NOT YET ORDERED YOU STILL HAVE A CHANCE!****(Updated on Aug. 6th, 2009)
Hey all,
Karen Wilkinson, who came to do the bread party, is having an order in a few weeks on different things (also found at Emergency Essentials) but take a look, compare, and if you are interested in ordering, follow instructions on her website! I am ordering a few things for my food storage.
Here is the link to the ordering information:
http://kneadfulthingsnow.com/currentpreorder.aspx
And also, she is doing what she calls Menu Madness, where she posts a new recipe every Monday and Thursday of June, July, August and September of 2009. Along with the recipe, is a years supply of ingredients, if you eat each meal once a month. This is what I have done for my 3 month food supply, so I am excited to use this resource to extend my menu for my year food supply! You can pick and choose what meals you would like to incorporate into your menu plan.
Here is the link:
http://kneadfulthingsnow.com/menumadness.aspx
(I have tried the taco soup and my family enjoyed it! Good luck!)
One more thing...I am planning a cheese waxing class and hopefully a class on canning our own meats, so I'll keep you posted on the details!! If you have any experience with either, let me know!
Hey all,
Karen Wilkinson, who came to do the bread party, is having an order in a few weeks on different things (also found at Emergency Essentials) but take a look, compare, and if you are interested in ordering, follow instructions on her website! I am ordering a few things for my food storage.
Here is the link to the ordering information:
http://kneadfulthingsnow.com/currentpreorder.aspx
And also, she is doing what she calls Menu Madness, where she posts a new recipe every Monday and Thursday of June, July, August and September of 2009. Along with the recipe, is a years supply of ingredients, if you eat each meal once a month. This is what I have done for my 3 month food supply, so I am excited to use this resource to extend my menu for my year food supply! You can pick and choose what meals you would like to incorporate into your menu plan.
Here is the link:
http://kneadfulthingsnow.com/menumadness.aspx
(I have tried the taco soup and my family enjoyed it! Good luck!)
One more thing...I am planning a cheese waxing class and hopefully a class on canning our own meats, so I'll keep you posted on the details!! If you have any experience with either, let me know!
Just grindin some wheat!
Look what I did! I used my new Wonder Mill Grinder!! I just received it from our last months order from Emergency Essential (I was able to get free shipping too!) and couldn't wait to use it! I know I may sound like a geek, but it was really exciting!
Here it is!
Here it is!

 It's so nice to know that I can use all that wheat I have stored!! I am also happy to say that I will not be joining the 90% of people that have wheat stored and DO NOT have a wheat grinder:)
And here is my first batch of wheat flour! The first bowl is my wheat and the second is my flour...made in like 5 seconds!
It was so easy! The grinder is really nice and I would recommend it to anyone. It wasn't too loud either. I actually did it when my little Noah was sleeping and Tayla wasn't scared when I turned it on! If anyone would like to come over to check it out before you purchase it, let me know. I'm happy to show you:)
Now I just need a hand grinder just incase there is no power...I'm hoping they go on sale soon! And of course, if they do, I'll be sure to pass on the info:)
Sunday, June 7, 2009
Successful Bread Party
Karen Wilkinson did an awesome job teaching us her techniques on making bread and telling us the things that she does to get and maintain her food storage and also use it. A big thank you to her, for her time and talent!
 Here is my loaf (it's a bit lopsided, but hey it was my first try!)
I am so happy for all those (there were about 20 people there) that were able to come to the bread party this last Friday. It was just fantastic and the several people I talked with that went and took part in this activity said they had a great time, learned so much about making bread and other loads of info on food storage, etc. and also have a much stronger testimony of how important food storage really is!! Yay!
The bread we made was delicious, and it really was the most moist bread EVER!
 Here is Tayla eating her SECOND piece of "Mommy's yummy bread"! She helped me roll it out with the rolling pin and watched me bake it, so she was really proud of mommy's first bread made from scratch!
*****If anyone else is interested in having Karen come back for another bread party, or a food storage seminar, please contact me and I will be more than happy to arrange something!! I know that there were quite a few that would have liked to come, but couldn't*****
Subscribe to:
Posts (Atom)


