

Cheese wax can be purchased at: http://www.blendedwaxes.com/ This is my 5 pound block of cheese I bought for $20.00 and $12.62 for shipping (since it's so heavy). We may have an opportunity to order wax for wholesale so we can get a better price, so I will keep you informed on that.
It is important to use cheese wax. Paraffin wax does not work adequately. Paraffin is stiff and will crack when it cools allowing for the penetration of air and mold causing bacteria. Cheese wax is made specifically to coat cheese. It is formulated to be more pliable, and does not crack as easily.
 Items needed for cheese waxing:
 Cheese wax melts at lower temperatures and should be melted in a double boiler. It’s best to get a double broiler that is fairly deep to give you plenty of room for dipping cheese. Dedicate a pan or bowl to this because the wax will claim the container as its own. The temperature of the melted wax can be between 160 and 220 degrees. The cooler the better. The wax should be melted just until there are no lumps and then turn the heat off. If the wax becomes too hot it will bring the oils of the cheese to the surface preventing the wax from adhering. Don't let it cool too much because your wax will start to get thick and your layers will be really thick and uneven.
Do not over handle the cheese with your bare hands. The oils from your hands can compromise the seal between the cheese and the wax. You also do not want to introduce any unwanted bacteria. Purchase some food grade disposable gloves from your local grocery store if you would like.
Any cheese that is firm enough to form a block can be waxed. The cheese should be cool, clean, and dry. I dry my blocks of cheese with a high quality paper towel before I dip them to soak up any excess moisture or oil. Cut the cheese into sizes that your family will use within a few days. I cut the cheese into the portion called for in a given meal; that way I am assured freshness.
Cheese is not rigid and will therefore bend and misshapen under it's own weight. As that happens it will pull the wax away from the cheese and cause air pockets. This is another reason why it is better to wax smaller lighter weight portions of cheese at a time.
Remember to heat your wax using a double boiler. You will read on the Internet that you can melt your wax in a #10 can. That is not a good practice. Number ten cans are not manufactured for constant water applications and will rust. The only double broiler I could find that would work was at Walmart for $30.00. That was the most inexpensive one I could find that would be deep enough. It is a one time investment that will last a life time. If you have more than one color of wax, use ceramic bowls or some other rust proof container that will fit on top of your boiler and can be heated.
 1. Use a potato peeler to shave wax from the block of wax and then after you get a good amount, add it to the broiler. When the wax has melted and there are no lumps, turn off the heat and wait a few minutes to start waxing so the wax isn't too hot.
2. Dry the block of cheese you will be waxing well, with a paper towel or lint free cloth. Flour sack cloths work well. I found that it was easier to handle the cheese if it was cold, and not setting out long.

3. Quickly dip the block of cheese half way into the wax. Allow the wax to dry slightly and dip the other half of the block, overlapping your 'dips'.

4. Allow the wax to cool before you set it on any surface otherwise it will stick. When you try to move the cheese it will pull away from the block just waxed. Set your finished blocks on the paper side of freezer paper, which has a paper side and a waxed side. (It will stick to the waxed side)
You may also use a natural bristle brush to coat the cheese. If you decide to use the brush method, a boar’s hairbrush is recommended for the smoothest application, and can be purchased at the same website as the cheese wax.
The wax should form an intimate bond with the cheese, hermetically sealing the cheese including any holes or crevices. This process protects the cheese from mold spores and unwanted fungal invasions. It also locks the natural moisture of the cheese in, preventing it from drying out and hardening.
Repeat the waxing process so that there is a minimum of three layers of wax. It is best to apply the second and third layers of wax while the previous layer is still slightly warm. You may choose to apply a fourth layer of wax for added strength.
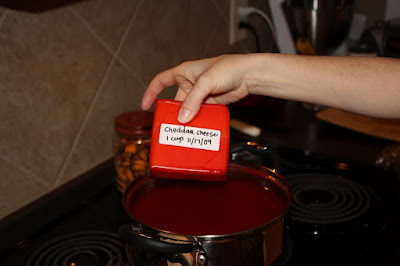 Label the cheese, type and date, before the last dipping so that the label is embedded within the wax and will not fall off. I use a self-adhesive sticker and a permanent marker.

The cheese should be stored in your coolest room (or even a mini fridge set around 60 degrees) stacked with like cheeses. Do not seal the cheese in additional containers, as the cheese requires air circulation.
 I bought my mild cheddar cheese at Sams. So I waxed 5 pounds of cheddar cheese, but split it up into 10 different serving sizes. I also bought Parmesan cheese at Sam's, but waxed even smaller portions because we don't typically use a lot of Parmesan cheese for meals.
 The cheese will continue to age over time, especially cheddar, so start with more mild cheeses. Parmesan, Swiss, Colby Jack cheese are also good. The harder and typically the more expensive the cheese, the better. Don’t try Mozzarella cheese because it spoils easily.
Although you will find that cheese wax is expensive, about 5.50/lb, it can be reused. Simply peel the wax off the cheese being used and wash it in warm soapy water. Allow the wax to dry and store it to be used in your next cheese waxing session.
You will need approximately three pounds of wax to cover ten pounds of cheese. I bought a 5 pound block of wax and I waxed about 8 pounds of cheese and I still have a ton of wax left over! I really didn't use much of it. I simply let it dry and kept it in my broiler and put the lid on to keep it dust free. All I have to do the next time I want to wax cheese, is slowly melt it again and repeat the waxing cheese process!
The experts say that cheese can be stored this way for twenty-five years. Of course if you are rotating your cheese, it will always be fresh!
If you have any questions, feel free to give me a call or email me: Crystal


